December in our house starts the same way. The tree goes up late on a Saturday because someone always leaves the lights in the attic. Kids ask for the tablet before breakfast. A small 3D printer changed that routine a bit. Ten minutes on the screen to pick a shape and a colour, then the tablet goes back on the charger.
Not the biggest machine. Not a model that takes all weekend. Just something a family can finish before dinner.
Why Holiday Screen Time Feels Different This Year
Most holiday screen time leaves nothing behind. A printed ornament stays. A child can hold it. Paint it. Hang it up the same evening and find it again next year in the box.
Every December we hear the same question from friends with a new printer. What do we print first? We learned to keep it simple. Flat. Small. Quick. A good first print needs space for paint and ribbon. It also needs room for a name on the back.
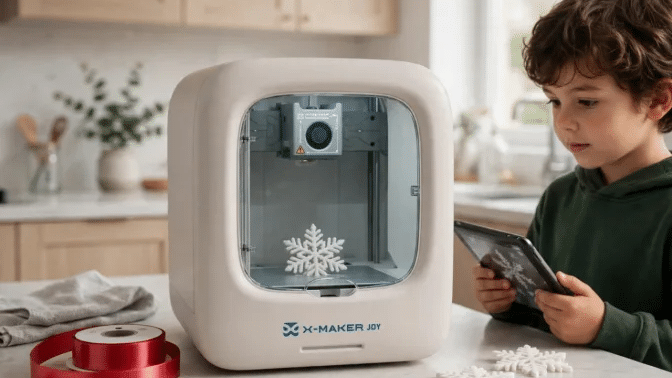
For families still choosing a machine, the kids printers from AOSEED are built around that kind of project. The JOY is the small one, listed for ages 4 to 12, and in our house it runs in PLA from a parent’s phone app, with a build area of 120 by 120 by 120 mm, which still fits a snowflake.
A project has a beginning and an end
A child should see the whole job from start to finish. Choose it. Print it. Then paint it at the table. Hang it up. When the print is done, the screen is done too.
Start with something small
A flat snowflake is the test we use with a new routine. The AOSEED ornament guide puts it at 4 to 6 grams of PLA and 30 to 45 minutes. If it fails, you lose a few grams and half an hour. Not a weekend. The failed piece goes in the bin and we start again.
Picking Projects That Fit a Real Family Week
Holiday weeks are busy. Print times need a plan, same as anything else. A Santa face takes closer to two hours. A wreath takes about the same. A hollow ball in two halves takes longer still. Check the time and the weight in the app before you start. Then nobody is surprised at 9 pm.
Printing by colour saves a lot of messing around. White does the snowflakes and the stars. Red does hats and berries. One person loads the filament. That same person takes the finished print off the plate. The child picks the colours and the names.
Ornaments first, gifts second
Ornaments forgive a lot. A star came out a bit uneven. It still looks fine on the tree once the lights are on. The name tag had a wobbly letter. It still counts as a keepsake. Gifts that need to fit together can wait until next year. So can gifts that move. Nobody needs a broken hinge on Christmas morning. Everyone else is opening presents.

How a First Holiday Print Usually Goes
The first print starts in the app. A child picks a ready model, or changes a name, or changes a colour. Then a parent loads the filament and checks the plate. Then they close the enclosed printer. That closed door stays shut while it works. Small hands stay away from the hot nozzle.
Give the print a minute to cool on the plate first. Then lift it off the plate. Painting is the part where it stops looking like everyone else’s ornament. Gold on a star. Dots on a tree. A name on the back of a tag, and paint on a sleeve as well.
Keep the small pieces high on the tree
Houses with toddlers need one rule for small ornaments. Put the smallest prints high up. Little hands cannot reach them there. Put the bigger, sturdier pieces lower down. A flat ornament about 3 mm thick will usually survive a fall. Ours hit the wood floor twice and came away with a scuff. Thin points under 2 mm snap. PLA softens in heat. Keep printed ornaments away from hot bulbs and candles.
Projects Beyond the Tree
Once the tree looks full, the printer can make simple gifts instead. A name tag turns into a stocking tag. A small star goes on top of a present. A snowflake taped to a card makes a plain card into something a child made.
Families who want more ideas can look at 3D printed Christmas ornaments kids can design on the AOSEED blog, where the ten ornament ideas are listed with print time, filament weight, and the level of adult help for each one. Flat, quick prints come first. The two piece ball comes last.
A snowflake takes only a few grams. That means a family can print a few test pieces first, before trying a bigger gift. A wreath takes 12 to 16 grams. A two piece ball takes 20 to 30 grams in total.
Conclusion
Screen time at Christmas does not have to be banned. Pick a model and print it flat. Paint it together. Then hang it where everyone can see it. The projects that work are the ones a child can finish in one sitting. Then the child can point to them on the tree.
Start with one snowflake or one name tag. Let the child pick the colour. Let them write the year on the back, even if the writing comes out crooked. By the end of the break, the tree holds a small set of ornaments. Those ornaments came from the kitchen table, not a shop.

This content is brought to you by the FingerLakes1.com Team. Support our mission by visiting www.patreon.com/fl1 or learn how you send us your local content here.